
How to take Screenshot Your Screen On PC Windows 7, 8 & 10
How to take Screenshot Your Screen On PC Windows 7, 8 & 10
At times, you might need to take a screenshot of a page or
an application window on your desktop PC and portablePCs; yet tragically, you presumably don't have the
foggiest idea about that each window PC has this incredible
element/function and this continues troubling you.
Okay, today I will show you the best practices to approach this
by following these direct and simple tech beneath.
Nonetheless, there are just three apparatuses required for taking
screenshots on PCs for Windows 7, 8 and 10. These incorporate
your Keyboard, Microsoft Paint Program and the Snipping Tool.
SCREENSHOT IN WINDOWS 7
In Windows 7 and the two Windows Vista, the OS works with
the above three mentioned apparatuses and such works superbly
for all.
Using the snipping tool in Windows 7, you can select the area of
the screen to capture whether for the whole screen or only a chose
window and this spares much worry than utilizing other tools as
Keyboard and Microsoft Paint Program which includes pasting the
picture from the clipboard.
Screenshot Using the Keyboard and
Microsoft Paint Program
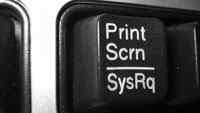
- Check out for the Print
Screen button on your keyboard usually
labeled as PrtScrn
- Press the PrtScrn
button on your keyboard to capture the
whole screen - To capture just the active
window displayed screen, press Alt
+ PrtScrn button - Open the Microsoft Paint
on your system, now press Ctrl +
V on your keyboard to paste the
image into the program - Click on the file menu of
the program and choose Save As,
then save the image to your picture
folder with your desired name.
Screenshot Using the Snipping Tool

- Click on your Start
button, then All Programs , Go
to Accessories then select
Snipping Tool as shown in the
image below. - Click the down arrow
beside the New button to choose your
Snipping type - Use your system mouse
to drag or select the area of your
screen or window page you want to
capture - You can also capture the
menu-options, or drop-down that
usually disappears when your mouse
button is being released, like the start
menu image below. To do this; open
your Snipping Tool, press ESC
Key from your keyboard, open the
menu or drop-down box you want to
capture. Now press Ctrl +
PrtScrn to capture the menu. - Finally, the screenshot
has been taken, now you can save it,
email it or copy it for pasting into
another application or window.

Step by step instructions
to SCREENSHOT IN WINDOWS 8 & 10
With the latest development and fast increase of improvements with
technology, the Microsoft Windows Publishers has made it pretty
simple and easy for taking screenshots in this version of windows.
In Windows 8 & 10, no much steps required as that of Windows
7. Below is the only one step to take to achieve this.
 On your Windows Desktop background or page you want to
capture, Press the Win + PrtScrn keys together
simultaneously on your computer keyboard, then the screen will
make a shot dim.
Apparently, you have gotten the screenshot, and it will be saved
immediately in your screenshot folder under pictures.
Finally, you have now gotten to know this very tips and tricks on
Capturing your PC screen both for Desktop PCs and Portable
PCs.
This post might have in one way or the other helped you, kindly
leave a comment below, we love your comments; also subscribe to
this blog to receive fresh new updates like this another time.
You can also Share this with your friends.
On your Windows Desktop background or page you want to
capture, Press the Win + PrtScrn keys together
simultaneously on your computer keyboard, then the screen will
make a shot dim.
Apparently, you have gotten the screenshot, and it will be saved
immediately in your screenshot folder under pictures.
Finally, you have now gotten to know this very tips and tricks on
Capturing your PC screen both for Desktop PCs and Portable
PCs.
This post might have in one way or the other helped you, kindly
leave a comment below, we love your comments; also subscribe to
this blog to receive fresh new updates like this another time.
You can also Share this with your friends.
This is nice and informative. Thanks for sharing
ReplyDeletewww.africalinked.com
AfricaLinked